Customer Profile, Universal ID card and NFC Scanners
Bhadre is a high security system for access controls. Every user has a unique global ID, and a Universal ID Card. Those who do not want to use Smartphones for access, this universal ID card can be used. A user needs only his Universal ID card or smartphone to access any facility or building globally, so long as the owner of the facility has given access to that user. This system, thus, eliminates the need to carry multiple keys or access cards wherever he/she goes. This universal ID along with face recognition or 2FA with OTP makes the system highly secure.
Every user also has a profile in the system that he/she maintains. The identity of the user is verified using his/her drivers license and so, authentication of the user is done securely when he/she tries to access a gate or door. When a customer downloads the Bhadre App, and when he tries to use it, he will be propmpted to register his email address and prompted to set up a password. At this stage, his profile has very basic information and is not verified. With this basic profile, he can access any facility where high security is not needed. However,to access places where high security is configured, his profile has to be pre-populated and his profile has to be verified. Profile also needs a profile picture along with his full name and address. And, this profile has to be verified using his drivers licence. The sections below describe how a customer can do these steps.
This document explains how Persional ID card can be created and how these Card reader can be installed and configured to meet your needs.
1 Customer's profile
To use Bhadre system, one has to download Bhadre App. After downloading, open the App and click on Admin Dashboard. That will prompt the customer either to login, or to sign up, if not already registerd. Sign up with email address as the user name. Create a password. Once registered, customer's profile and a universal ID for that user is automatically creted. This profile can be seen if you click on My Profile under User Admin in Dashboard menu. This profile will have very little information. The user can update all the rest of his details on this profile page. A profile picture may also be uploaded by clicking the tab 'Upload profile picture' on this page. This profile is not verified yet. You can see that in the field 'Customer Verified' in your profile. To verify your profile, you need a valid drivers license, or a clear copy of that. To verify your profile, press the 'Verify My Profile' under My Profile page. You will then be prompted to upload a copy of your drivers license. You can choose a JPG type picture of your drivers license or, you can take a picture of your license using the resr view camera of your smart phone. Choose the method that you wnt to use, and upload a copy of your drivers license. If your copy of drivers license is readable, and if it got all the beeded fields, it will match the photo on your drivers license with your profile picture. If profile picture is not in your profile, you will be prompted to take a selfie using the front camera of your smart phone. Then it will compare your selfie with the photo on your drivers license. If everything matches, your profile will be verified and a success message will be displayed. and set the 'Customer Verified' field in your profile to 'Verified'. Your profile will remain verified until you chnge any of the fields in your profile.Note: When using face recognition for accessing any facility, it will compare your selfie with this profile picture, and that is how it authenticates you to give access.
2 Creating and Enabling Personal ID Card
Every user of Badre system has a unique ID. That ID is created automatically when the user registers with bhadre.com. An ID card is also automatically generated with a unique QR code, and with your profile picture. To see your unique ID card, click on 'User Admin' in Admin Dasboard of Bhadre.com, after logging in. Then under User Admin, click on "Show ID Card. That will show your ID. That ID will also have your photo, if you had uploaded your photo into your profile. What you need to add to this ID is an NFC tag and laminate it.
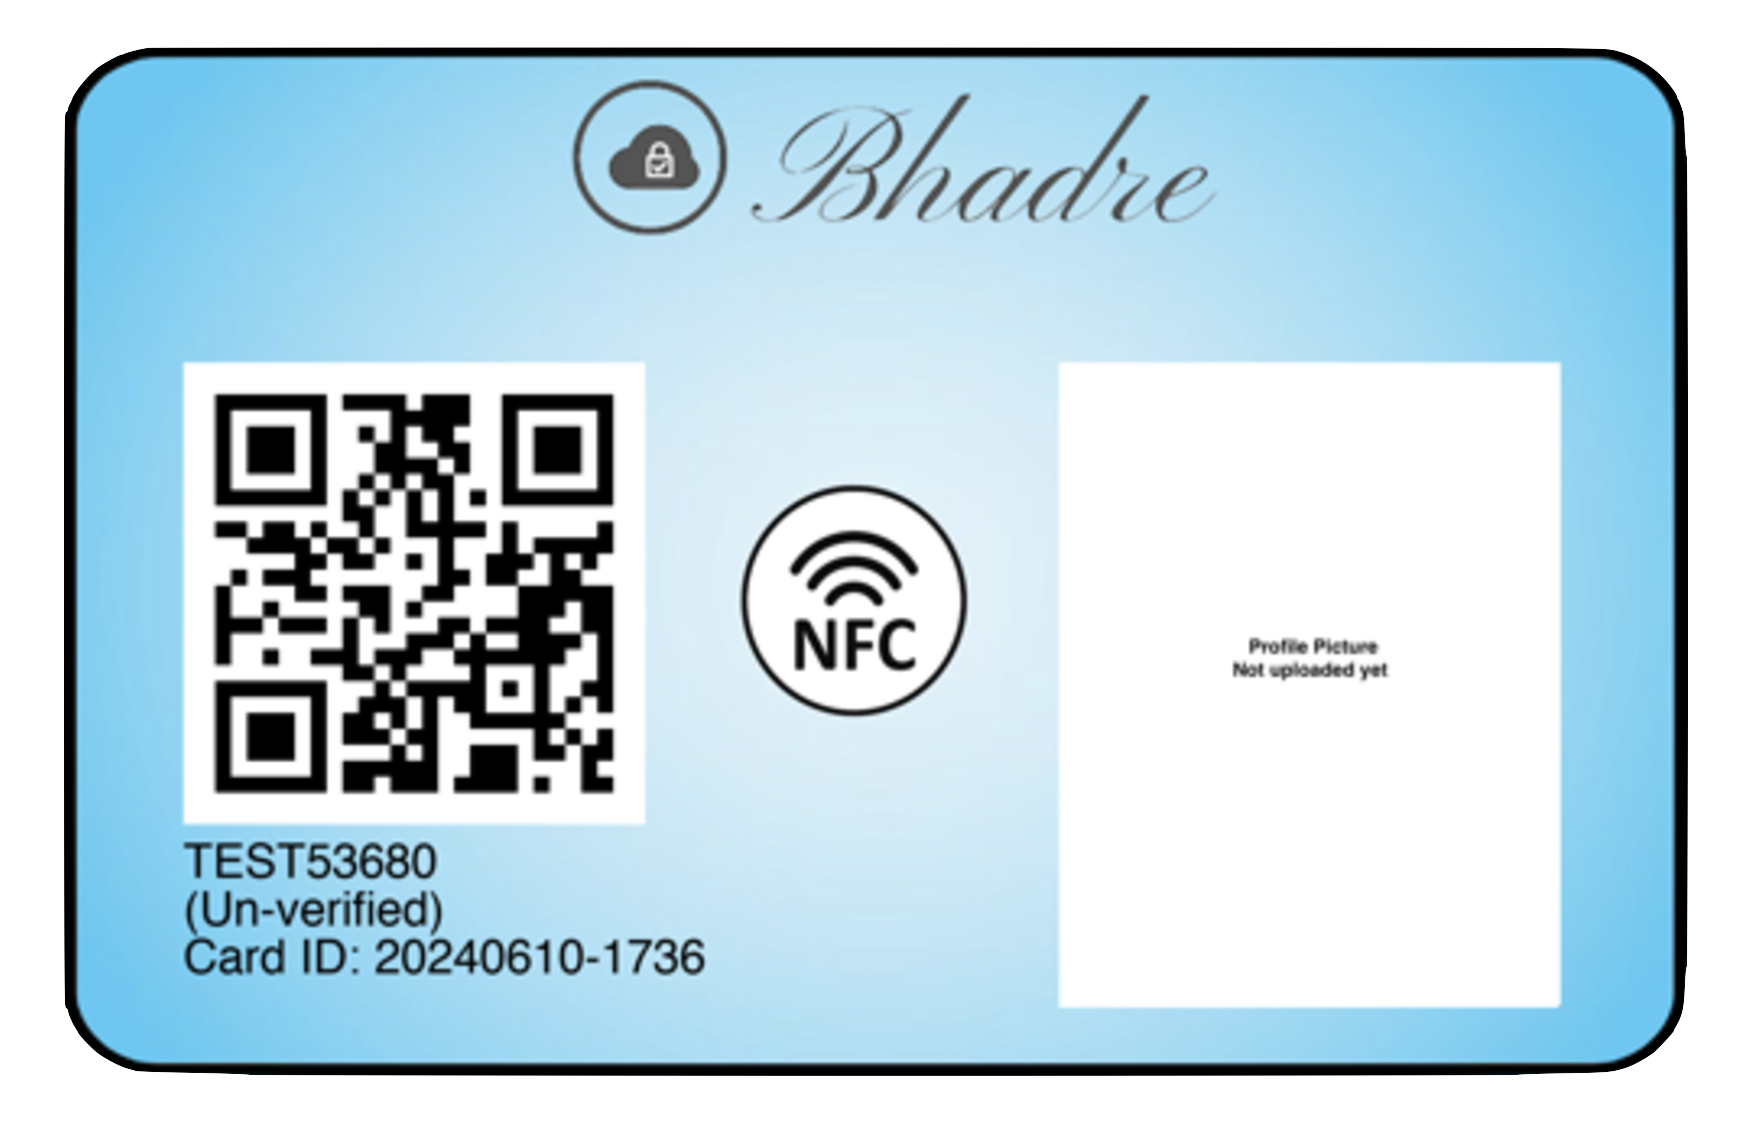
If profile picture is not uploaded yet, the ID card will not have your photo. You can print and make your own ID card. If you scan the QR code on this ID card using the Bhadre App, it will display the details of the person to whom this card belongs. But, this cannot be used anywhere unless it has an NFC tag on it. A unique NFC tag can be attached with this ID card. You need to purchse an NFC tag-id.
These are available in eBay or Amazon or any similar online stores. We support only Mifare Ultralight 14443-3A type of tags which has 7 bytes of UID. These are very inexpensive tags that you can buy from anywhere. These tags come as stickers as well.
Search for "Mifare Ultralight 14443-3A NFC Tags' in eBay or Amazon. These NFC tags are available in different type of shapes and packaging. These tags come as stickers as well. You can use the type you like so long as it is Mifare Ultralite with 7 bytes of UID and are stickable on your ID card.

Each of these Tags is unique. There is no other tag with its unique ID. Once you purchase it, stick that on the back of your ID card. In fact, this NFC tag can also be stuck on any of your other cards such as drivers licencec and use that as your personal ID card as well. After sicking this NFC tag to your ID card, you need to associate that with your unique ID. To associatre this card and to enable your ID card, open the Bhadre App on your smart phone and press 'Scan NFC Tag' and scan the tag that you just stuck on your ID card.
If this is a new tag and if it is not associated with any other device earlier within our system, you will be taken to a page prompting you to select one of your devices to associate this tag to. A pulldown list will contain all the devices you own (all those devices that are powered on), as well as your personal ID card. Choose your personal ID card, and choose 'Yes'. Leave 'Exit' or 'Entry' field in trhat form as default as it is not used when associating with personal ID card. Then press Submit button. If the system finds no conflict and if it finds this is a unique one, it will show a success message. If it failed, you may have to try another NFC tag. If it is successful, your personal ID card is enabled to use with Bhadre system and can be used wherever Bhadre system is installed.
The ID card that you just enabled is a Universal ID card. Nobody else will have an ID card with this NFC tag as NFC tag itself is unique. You can disable your tag anytime if you have either lost it or do not want to use it any further. Disabling can be done in User Admin under Admin Dashboard and clicking the button 'Disable Personal ID'. As this can be done by yourself any time, you can be sure of minimising damage if it is either lost or anybody mis-using your card.
You can now use your personal ID card for opening doors and gates, turning on lights and fans and any other equipment or service that are managed by Bhadre Automation LLC. To get access, the owner of the premise or facility should have allowed you as a user as per the documentation on "Allowing Others to use Your Devices". You do not need any other card if the system is Bhadre. You can replace all other access cards with this personal ID card if the access control system is from Bhadre. All restrictions on access is configured by the owner of the premise or facility, with full control of access being with the owner of the facility.
To use this personal ID, the doors or gates must have NFC scanner associated with that Door or gate. The following sections of this document explains how NFC scanners can be installed on doors and gates.
3 NFC ID Card Reader
This scanner comes in two parts - a scanner and a wifi transmitter/controller. When installing, you need to install them next to each other and conect them together as explained in the Installation section below.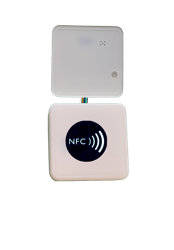
4 Installation
This NFC ID card reader has two parts --- 1) NFC scanner and 2) wifi transmitter/controller. If you are going to use this for opening a door or gate, install these two parts next to each other on the wall or anywhere outside the door/gate where it is accessible convieniently. Wire these two parts together using the flat cable (6-pin JST cable 1.25mm pitch) as shown in the pictures below.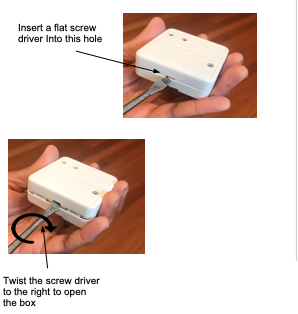
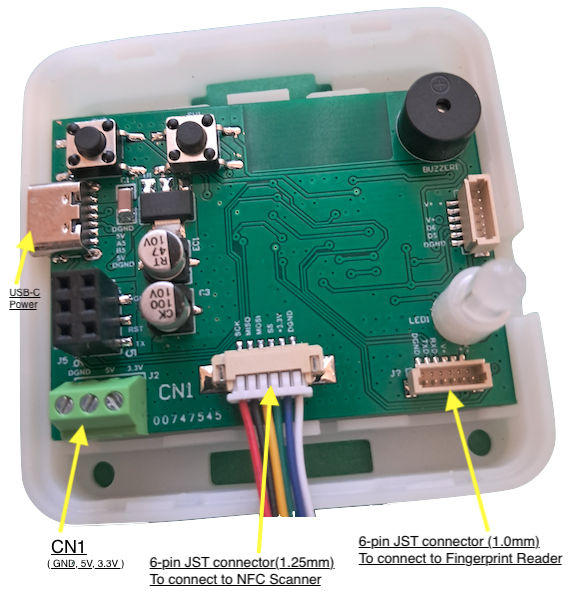
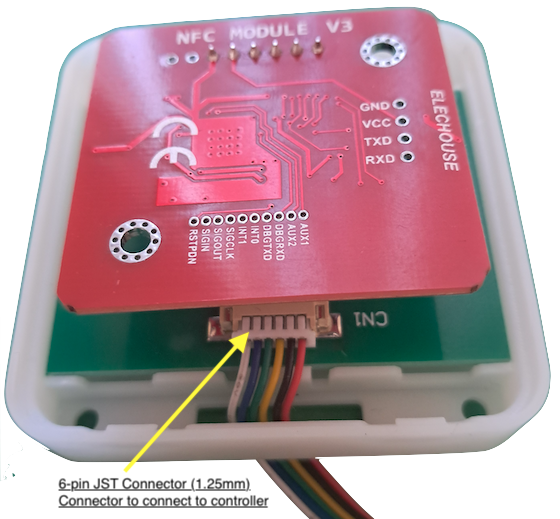
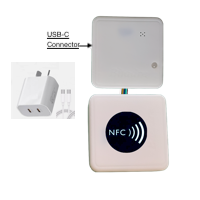
After cabling, close both boxes and install them next to each other on the wall or wherever convenient. You also need a power outlet next to it to apply 5V power. You can either use a 5V USB-C power adapter (the same as the one used for smart phones), or a 5V power supply and wire it to the green CN1 connector on the PCB inside the box.
5 Initial Setup and Common Configurations
In order to use this NFC ID card reader, it needs some initial minimum configuration. That includes setting its WiFi, assigning a name to this scanner and so on. This is a common procedure for all devices bought from Bhadre. Click here to see the instructions on doing the initial configurations of this device.6 Setting up the Scanner
The initial configuration described in the above section helped you set its WiFi as well as assgning the ownership of the scanner to yourself. After completing those steps, there are are few more steps to complete before using the scanner. We need to associate this scanner with an access controller so that when we use an ID card to scan this scanner, it should know which access control device it should activate. So, prior to doing this step, it is important that your access controller device has already beed installed on the door/gate, and configured and functioning well. Refer to the documents related to Garage Door/Gate or Solenoid/Door for setting up caccess controleers, if you have not done that so far.To associate this scanner to an access controller (Door or Gate), login to https://Bhadre.com, click on Admin Dashboard. If you have not logged in yet, it will prompt you to login. If you are logged in, click on 'Devices Admin' in the page that opens. Under the Devices Admin menu, click on 'Setup Scanner' tab. If you have done the steps so far correctly, it will show you a window as shown below with a pull down menu to select your Scanner to attach its access controller. Make sure that the scanner is ON at the time of setting it.
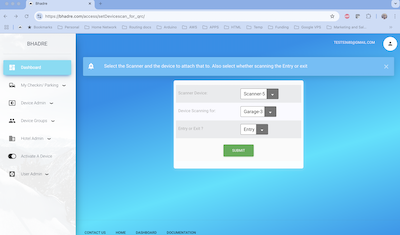
Select the scanner, then select the access controller that you want this scanner be attached to. Then select Entry or exit. Each access controller has two QRcodes - 1) for Entry and 2) for exit. For access controllers where you are using separate QRcode for entry and exit, then you need to choose the one that you want this scanner to be associated with. If you are using the same for entry as well as exit, you may choose either one of them, and it does not matter whether it is Entry or Exit. Once all fields are selected, press 'Submit' button. If successful, you are done with setting up this association. Hereafter, whenever you scan this scanner with your ID card, it will take action on the access controler associated with this scanner.
7 Monitoring Scanner's Display
The Scanner does not have its own display. In fact, for normal use, it does not need a display. If there are any errors, it will beep the sound twice. For successful scan, it will beep once. However, you can configure a browser on your computer or a smart device such as ipad to act as the scanner's display. Once configutred, you can see the messages from the scanner. In addition to beep, it will display any errors. It will also display a message for every successful scan.
To configure scanner's display on a computer or a smart device such as an ipad, open a browser (Chrome preferred) on that computer or smart device. Then go to https://bhadre.com. Then click on the Admin Dasboard tab. If you are not logged in yet, it will prompt for logging in. Then, on the dashboard, click on Devices Admin, and then on the new page, click on 'Show Scanner's Display'. Then, from the pulldown menu, choose your scanner. It will show only your scanners in the pulldown list, as you can associate scanner only with the access controllers that you own. After selecting the scanner, press Submit button. Now this new window will act as the display of the scanner. You can test it by scanning your ID card on the scanner.
8 Using ID card and Card reader to activate a Door or Gate
There are two ways of using the NFC Card reader -- 1) for activating the access door/gate whenver the ID card scanned belongs to an allowed user of the access controller, or 2)as a two-factor authentication method. Refer to the documentation on Garage Door/Gate or Solenoid/Door for configuring two factor authentication. If personal_ID is not configured as a two-factor authentication method for this access controller, the NFC ID card reader will be in the first method of activating the access controller whenever the scanned ID card is that of an allowed user of the access controller.